Setting up a Label Printer for Empower
The setup process for label printing is simple, but it can be a little intimidating because of various hardware options. We’re here to help lessen the intimidation and make sure you’re up and running.
We’ll walk through a few quick overview steps- and then we’ll dive into some of the more technical stuff below.
Empower supports multiple label brands and models of label printers. Dymo, Brother, and Zebra are a few of the most popular. If you have questions about your printer’s compatibility or are looking for help purchasing one, feel free to reach out to our customer support or see our blog article on Choosing the Right Printer for Empower.
It is important to note that Empower uses third-party software to connect the Empower system to your local printers. This link is QZ-tray. Each station that will be printing labels needs to have QZ-Tray installed.
QZ-tray
If this is your first venture into the Check-In system, you will likely see a red banner at the top of your Dashboard that says, “Cannot connect to QZ-tray.”

QZ-tray is third-party software that is necessary for Empower to communicate with your printer. It is free, safe, and should not change your computer’s performance in any negative way.
Before we go further, take just a moment to download QZ-tray here:
If your computer does not already have an updated version of Java installed, you will be asked to install Java 8 via a link from QZ-tray.
QZ-tray does also has some requirements for your computer’s software systems.
Are you having trouble? Don’t forget you can always contact our support team at the Contact Support page.
Connecting Your Printer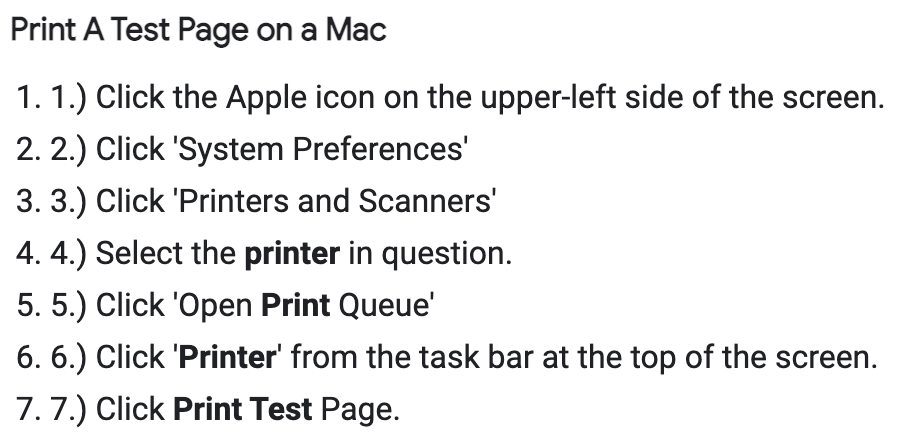
Once QZ-tray is installed, let’s make sure your printer is connected to the computer and communicating. If you have not already, make sure you have installed the appropriate drivers and software for your label printer.
For more help on your specific printer, consult your printer’s setup instructions or manufacturer’s website.
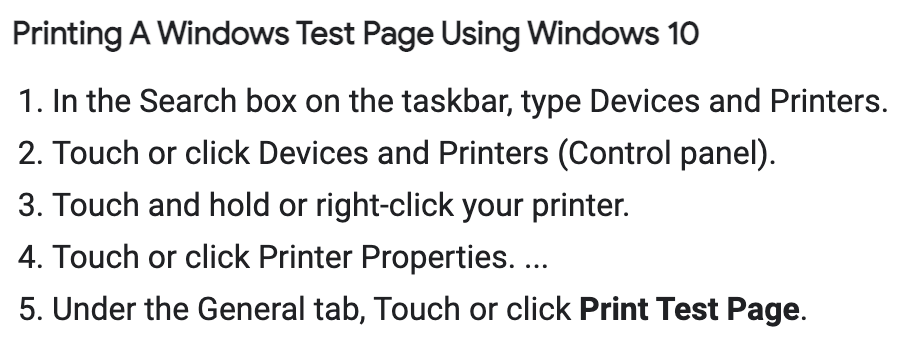
You can also test your printer by following the steps listed to the right.
Once we’ve installed the printer and QZ-tray, we can connect it to Empower and set up our first print station.
Defining your Stations
We’ll start by clicking on the Settings (gear) icon in the Dashboard’s top right corner. Then, click Check in Configuration.
This will bring up a new screen prompting for the station’s name (usually reflects the machine/device you are currently using). You can select one from the list or add a new station name by typing a new station name into the name field.
You will set up a new station for each computer or device used to check-in.
You will then have to select the print option:
“No labels needed,” “print to a local printer,” or “print to a network printer.”
Local Printer
The local printer option should be selected for those stations/devices that are directly connected or wired to the printer. These stations are typically desktop or laptop computers with a printer attached via a USB.
Network Printer
A network printer is a printer attached to another Station running Empower Check-in. Empower allows users to run multiple stations that simultaneously print to one (or more) printers connected to another station.
For example, Your children’s lobby could run one desktop computer Station with a printer attached. Additionally, you could have two greeters with tablet Stations that were not connected to the local printer but printed (via Network Printer) to the desktop station.
Network Printers allow you to spread the responsibility of check-in out and provides the freedom to utilize devices that might not directly connect to printers (tablets, phones, etc.).